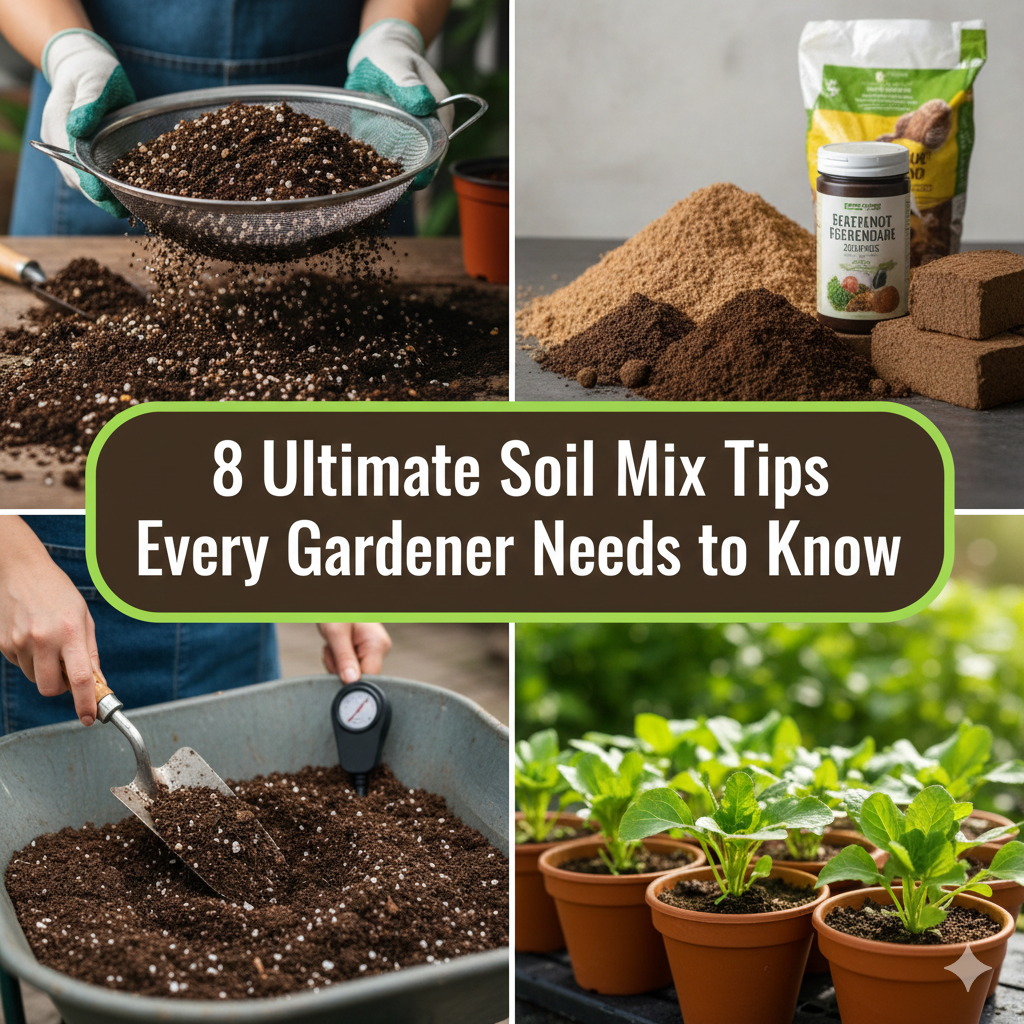
Hey friends, if you’ve ever stared at a bare windowsill or a sad corner of your patio wishing for a pop of green that doesn’t cost an arm and a leg, you’re in the right place. I’ve been tinkering with plants for years now, and nothing beats the satisfaction of turning something destined for the trash into a little home for a fern or a burst of petunias. These eleven ideas aren’t just quick crafts—they’re conversation starters, budget savers, and tiny acts of rebellion against boring store-bought pots. Some use stuff you already have in the garage, others need a quick thrift-store run, but every single one can be finished in an afternoon or a lazy weekend. I’ll walk you through materials, the exact steps I follow (and the mistakes I’ve learned from), plant suggestions that actually thrive, and little tweaks so you can make them your own. Whether you live in a tiny apartment or have a sprawling backyard, there’s something here that’ll make your space feel more alive. Grab a coffee, maybe a notebook, and let’s dive in. By the end you’ll have enough inspiration to fill every ledge and shelf you own.
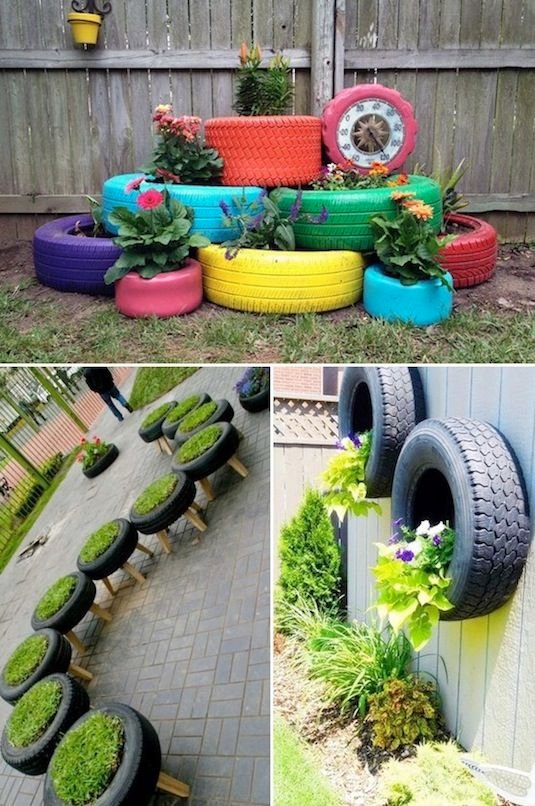
The first one I always recommend to beginners is the recycled tire planter because honestly, who doesn’t have an old tire or two kicking around? Tires are tough, weatherproof, and surprisingly stylish once you give them some love. I first tried this when my neighbor was throwing out a set after a blowout, and I ended up with three planters that lasted through two brutal Karachi summers without cracking. They’re perfect for patios, driveways, or even as a focal point in a small garden bed. The round shape holds a surprising amount of soil, and you can stack them for height or paint them wild colors to match your vibe. Environmentally, you’re keeping rubber out of landfills, which feels pretty good when you water your flowers and know you did a tiny bit for the planet.
For one medium tire planter you’ll need: one clean passenger-car tire (free from any tire shop that’s tossing them), exterior spray paint or acrylic craft paint plus a brush, a utility knife or jigsaw if you want to cut shapes, landscape fabric or old burlap to line the bottom, potting soil mixed with a handful of perlite for drainage, and whatever plants you love—think bright marigolds, trailing ivy, or even a dwarf tomato if you’re feeling ambitious. Cost? Practically nothing if you scavenge.
Start by scrubbing the tire inside and out with soapy water and a stiff brush to get rid of road grime and that weird tire smell. Let it dry completely in the sun. Next comes the fun part—painting. I like to tape off stripes or stencils for a geometric look, but you can go full abstract with drips and splatters. Two or three thin coats dry faster and look more professional than one thick glob. While that dries, cut a circle of landscape fabric slightly larger than the tire’s inner diameter and lay it across the bottom to keep soil from washing out. Flip the tire right-side up on its final spot (tires are heavy once filled, so position it first). Fill about two-thirds with your soil mix, leaving room for the root ball. Plant your choices, water deeply until it runs out the bottom—wait, tires don’t have drainage holes? That’s where the fabric and perlite come in; just don’t overwater and you’ll be fine. I once drowned a whole batch of impatiens because I forgot to mix in perlite—lesson learned.
These planters shine in full sun but can handle part shade if you pick shade-loving plants like hostas or coleus. In my experience, succulents do okay but prefer something with more depth like sedum in bigger tires. For variations, stack two tires for a taller tower—secure with landscape screws—or cut the top third off one side and turn it into a whimsical face planter for kids. If you live in a windy area like I do near the coast, weigh the bottom with a few stones before adding soil. One tip I swear by: add a slow-release fertilizer pellet when planting because tires heat up in the sun and dry out faster than you’d think. After a season you’ll notice the rubber develops a nice patina, almost like aged leather. Mine have hosted everything from cherry tomatoes that actually produced fruit to a riot of zinnias that drew butterflies all summer. If you’re worried about chemicals leaching, line the inside with heavy plastic sheeting first—though most modern tires are pretty inert once cleaned.
Next up, and one of my absolute favorites for quirky charm, are old rain boot planters. There’s something so playful about a bright red Wellington boot sprouting herbs or flowers right by your front door. I started collecting mismatched boots from thrift stores after a rainy season left me with soggy feet and a sudden idea. They’re small but mighty, perfect for apartments or narrow balconies where space is tight. The rubber holds moisture well, and the boot shape adds instant personality—no two are alike.
Gather a pair of old boots (kids’ sizes work great for tiny succulents), a sharp awl or drill for drainage, gravel or small pebbles, potting mix, and plants like chives, thyme, or low-growing sedums. I once used a pair of bright yellow fishing boots I found for fifty rupees at a roadside stall.
First, wash the boots thoroughly—inside and out—and let them air dry. Turn them upside down and punch several holes in the sole with your awl; I usually do five or six to make sure water escapes. If the rubber is thick, a cordless drill with a small bit works wonders. Add a one-inch layer of gravel at the bottom for extra drainage, then fill with soil almost to the top. Gently tuck in your plants, firm the soil, and water until it drains out the bottom. Place them where they’ll get the light your plants need—herbs love sun, succulents tolerate bright indirect.
Boots are surprisingly forgiving, but they can get heavy when wet, so group them on a tray if you’re worried about tipping. I like to cluster three or four different colored boots together for a rainbow effect; it brightens up even the grayest monsoon day. For a twist, paint the boots with leftover house paint for a distressed look or tie twine around the top for a rustic band. One summer I planted mint in a blue boot and it grew so vigorously I had to harvest twice a week for mojitos—true story. Just watch for root rot if you forget to empty the tray underneath after heavy rain. These little guys also make the sweetest housewarming gifts; I’ve given away at least a dozen over the years and people still text me photos months later.
Moving on to something daintier, vintage teacup planters are pure whimsy. I discovered these when my grandmother’s old china cabinet finally got sorted and I couldn’t bear to toss the mismatched cups. They’re ideal for succulents or tiny air plants because they don’t hold much soil, which keeps things from getting soggy. Perfect for desks, kitchen windows, or even as wedding favors if you’re feeling fancy.
You’ll need old teacups and saucers (thrift stores are goldmines), a strong waterproof glue like E6000, small pebbles, cactus/succulent soil, and baby succulents or tillandsia. I splurged once and bought a set of floral patterned cups for a friend’s baby shower.
Clean everything thoroughly and dry it. If the cup doesn’t already have a drainage hole—which most don’t—skip drilling porcelain unless you have a special bit; instead, glue the cup securely to the saucer so excess water can collect below. Add a thin layer of pebbles, then soil, and plant your succulent gently. Press lightly and mist rather than pour water. These live happily on a sunny shelf but hate direct midday scorch, so rotate them weekly.
The beauty is in the details—mix patterns for eclectic charm or keep them all white for a clean look. I once lined up six teacups along a narrow mantel and they turned the whole living room into a miniature jungle. Care is simple: water every ten days or when the soil feels bone dry, and fertilize sparingly with diluted succulent food. If a plant outgrows its cup, transplant to a slightly larger vintage find. One caution: teacups are fragile, so keep them away from curious cats or rowdy kids. But the joy when someone notices the tiny echeveria peeking out of a floral cup? Worth every careful placement.
Let’s talk mason jars, because who doesn’t have a few lurking in the cupboard? Painted mason jar planters bring farmhouse charm indoors or out, and they’re ridiculously easy to customize. I started making these during lockdown when I had more jars than pasta sauce and a sudden herb obsession. They’re great for windowsills, hanging in clusters, or grouped on a tray for a mini kitchen garden.
Materials are simple: clean mason jars, chalk paint or spray paint in your favorite colors, gravel, potting soil, and herbs like basil, parsley, or oregano. I like the wide-mouth pint size best.
Wash and dry the jars. Paint the outside—two coats usually do it—and let them cure for a day. Drill or poke drainage holes in the bottom if you plan to use them outdoors; indoors you can skip and just pour out excess water. Layer gravel, soil, plant, water. Hang them with twine or set in a wooden crate for stability.
These jars love bright indirect light and consistent moisture without sogginess. I keep a set on my kitchen counter and snip fresh herbs daily—nothing beats homemade pesto from your own plants. For variation, paint ombre stripes or add chalkboard labels so you remember what’s what. One time I overwatered and the basil turned yellow; now I stick my finger in the soil first. They also make adorable gifts—tie a ribbon and a seed packet around the neck and you’re done.
When you want something bigger and more structural, pallet wood vertical planters steal the show. Pallets are everywhere—behind grocery stores, construction sites—and turning them into living walls feels like alchemy. I built my first one after a friend gave me three free pallets, and it now covers an ugly fence in my tiny backyard with strawberries and flowers.
You need one or two wooden pallets (heat-treated, not chemically treated), sandpaper, exterior wood stain or paint, landscape fabric, staples, soil, and trailing plants or herbs. Hammer and screws help too.
Break down the pallet if needed or use whole. Sand rough spots, stain for weather protection, and let dry. Staple fabric to the back and between slats to create pockets. Fill pockets with soil, plant, and water from the top so it cascades down.
These thrive in full sun and need watering more often than ground beds because of the vertical setup. I plant strawberries in the lower pockets and herbs up top—harvested all summer. For indoors, use smaller sections and faux plants or air plants. Add wheels to the bottom for mobility. My biggest tip: test stability against a wall before filling; pallets can tip if top-heavy. After a year the wood weathers beautifully to silver-gray, blending right into any garden.
Hanging plastic bottle planters are a game-changer for small spaces and eco-warriors. I started saving soda bottles after seeing a viral video, and now my balcony has a vertical garden that cost almost zero. They’re lightweight, recycle waste, and create a cascading jungle effect that always gets compliments.
Collect clean 2-liter bottles, scissors, string or fishing line, a nail for holes, soil, and trailing plants like pothos or strawberries. Spray paint optional for color.
Cut the bottom third off each bottle, flip the top part upside down inside the bottom like a funnel, or simply cut windows in the sides for planting pockets. Punch holes near the top for hanging string. Add soil and plants, then string them in a chain or row from a dowel or railing.
Water from the top and let it drip through—genius self-watering hack. They love bright light but hate direct all-day sun or the plastic can warp. I’ve grown cherry tomatoes in a tall tower of six bottles; the vines trailed beautifully. Variation: paint them metallic or wrap with washi tape for indoor glam. Just rinse thoroughly first so no sticky residue attracts ants. These have survived monsoons and heatwaves with minimal fuss.
Toolbox planters bring industrial cool to any space. I found an old rusty metal toolbox at a scrap yard for next to nothing and turned it into a succulent haven that sits proudly on my porch table. The compartments keep different plants separated, and the handle makes it portable.
Grab a vintage metal toolbox, wire brush or sandpaper, rust converter if needed, gravel, cactus soil, and succulents of varying heights.
Clean and remove rust, apply converter if you want to keep the patina. Drill drainage holes in each compartment bottom. Layer gravel, soil, plant, water sparingly.
Succulents adore the shallow depth and good airflow metal provides. Place in bright indirect light. I mix echeveria with haworthia for texture. Variation: line with plastic if you worry about metal leaching, or paint the outside matte black for modern edge. One mistake I made early was overwatering—the toolbox held moisture longer than expected. Now I wait until soil is completely dry. These also work indoors on bookshelves and spark chats every time guests notice the tools still visible on the sides.
Birdcage planters are pure magic for romantic or boho spaces. I rescued a rusty antique cage from a flea market and filled the base with moss and ferns—it looks like a tiny enchanted forest. The open bars let light and air flow perfectly.
Find an old birdcage (thrift or online), wire cutters if needed, sphagnum moss, potting mix, and shade-loving plants like ferns, ivy, or orchids.
Clean the cage, remove the bottom tray if it’s solid and replace with wire mesh for drainage. Line the base with moss to hold soil, fill, and plant. Hang from a hook or set on a table.
These prefer bright indirect light and high humidity—mist daily if indoors. I keep mine on a covered porch and the ferns have tripled in size. Variation: paint the cage soft pastel or leave rustic. For succulents, skip deep soil and use tillandsia wired to the bars. Drainage is key; I add a drip tray underneath. The first one I made lasted two years before the wire finally gave way from weight—now I reinforce with extra chain.
Quick DIY concrete planters look expensive but cost pennies. I learned a no-mix trick using old plastic containers as molds and premixed bags—done in minutes. They add modern sculptural flair to any porch.
You need two nested plastic containers (like yogurt tubs or buckets), cooking spray, concrete mix or ready-to-use, gloves, and plants once cured.
Spray the larger container inside and smaller outside. Mix concrete to peanut-butter consistency, pour into large mold, press small mold in center for the planter shape. Tap to remove bubbles, cure 24-48 hours, then unmold.
Sand rough edges, seal if desired. These are heavy and perfect for outdoors. I plant drought-tolerant lavender and they thrive. Variation: add pigment for colored concrete or embed shells for texture. My first batch cracked because I unmolded too soon—patience pays. Indoors they make stunning coffee table centerpieces.
Thrifted suitcase planters are unexpectedly elegant. I picked up a battered vintage case at a market and lined it for trailing plants—it travels nowhere but looks like art. Great for patios or entryways.
Find a hard-shell suitcase, utility knife, heavy plastic liner, gravel, soil, and trailing vines or flowers.
Cut the top half off or keep as is and prop open. Line interior with plastic, punch drainage holes through bottom if possible. Layer gravel, soil, plant.
These like part sun and regular water. I use petunias that spill over the edges dramatically. Variation: stack two open suitcases for levels or paint the exterior. One issue is weight—use lightweight soil mix. Mine has survived two moves and still looks charming.
Finally, upcycled ladder planters turn old wooden ladders into vertical displays. I sanded an inherited rickety ladder and now it holds pots on every rung in my living room corner.
Get a wooden ladder (stable, not wobbly), sandpaper, paint or stain, small pots or directly plant pockets, soil, and cascading plants.
Sand and paint if desired. Lean securely against wall or hang horizontally. Place potted plants on rungs or attach wire baskets.
They save floor space beautifully. I rotate pothos and philodendron for year-round green. Water from top down. Variation: attach to wall permanently or add wheels. Secure the base so it doesn’t tip—mine has a small block of wood underneath. This last one always gets the most “how did you think of that?” comments.
There you have it—eleven ways to turn everyday junk into living art. Each project has taught me something new about patience, creativity, and the simple joy of watching something grow. Start with whichever speaks to you most, gather your supplies, and don’t be afraid to mess up; that’s where the best stories come from. Your plants will thank you, your space will feel warmer, and maybe you’ll inspire a neighbor to try too. Now go make something beautiful. Happy planting!