I’ve been messing around with gardening for over a decade now, starting from a couple of pots on a tiny balcony to full-on raised beds in whatever patch of dirt I could claim. But nothing quite clicked for me like getting my first mini greenhouse a few years back. It was one of those pop-up kinds you order online for under a hundred bucks, the kind that looks almost too simple to work. I set it up thinking it’d just protect a few seedlings from the odd late frost or heavy rain, but it ended up changing how I garden entirely. Suddenly I was starting tomatoes in February instead of waiting for April, growing herbs year-round even when the weather turned nasty, and harvesting fresh salad greens when the grocery store stuff tasted like cardboard. The best part? It didn’t take up much space or cost a fortune to maintain. If you’re reading this because you’re curious about dipping your toes into mini greenhouse growing, or maybe you’ve tried one and it didn’t quite deliver the results you hoped for, stick around. These seven easy tips come straight from my own trial-and-error adventures, the kind where I learned the hard way that skipping a step can turn thriving plants into a sad, wilted mess overnight. Nothing fancy or complicated here—just practical stuff that actually works in real life, whether you’ve got a sunny backyard corner or a windswept balcony.
I remember the first time I lost an entire tray of basil seedlings to damping-off fungus. The little stems just collapsed like they’d been snipped with invisible scissors. I had the greenhouse in a decent spot, or so I thought, but I hadn’t paid attention to airflow or how damp the air got inside on cool evenings. Another time, a strong gust caught my lightweight setup and sent it tumbling across the patio, pots flying everywhere. And don’t get me started on the summer when temperatures inside spiked so high my cucumber leaves crisped up before I could blink. Each of those flops taught me something valuable, and now my mini greenhouse is basically my happy place—a little plastic-and-metal sanctuary where I can tinker with plants even when life gets busy. The tips I’m sharing aren’t pulled from some textbook; they’re what I’ve refined through seasons of growing everything from peppers to flowers to exotic microgreens. They’ll help you avoid the common pitfalls, save you money on replacements, and most importantly, make the whole experience enjoyable rather than frustrating. Let’s jump right in with the first one, because getting this right sets the tone for everything else.
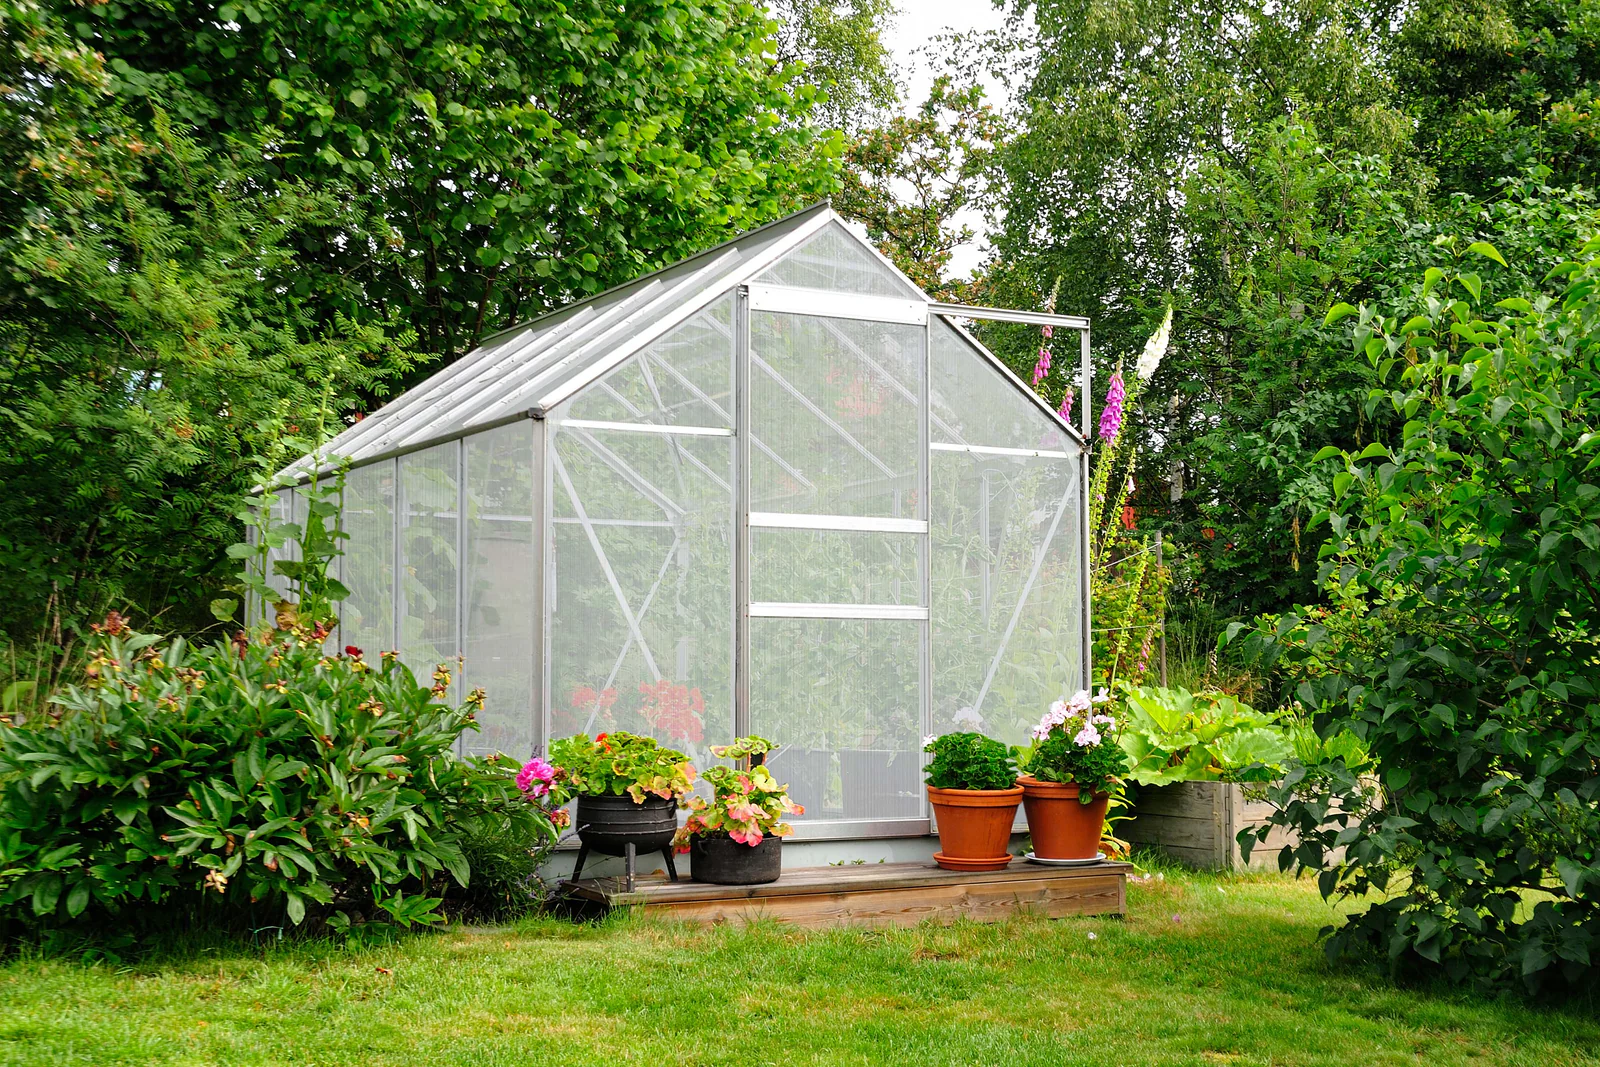
Choosing the right location for your mini greenhouse is hands-down the foundation of success, and I can’t tell you how many times I’ve seen people (including my younger self) slap one together in the first convenient corner without thinking it through. Sunlight is king here. Plants inside a greenhouse still need light to photosynthesize, and even the clearest plastic or polycarbonate panels cut down on some intensity. Aim for at least six solid hours of direct sun daily, preferably in the morning when it’s gentler but consistent. In my case, I finally settled on a spot along the east side of the house after trying three different places. The morning light hits strong, and by afternoon there’s a bit of dappled shade from a nearby fence that keeps things from baking in midsummer heat. If you’re in a warmer area where afternoons scorch, that partial protection makes a world of difference—I’ve watched neighbors’ setups in full western sun turn into ovens, with thermometers hitting over a hundred degrees inside while their plants gasped for relief.
But light isn’t the only consideration. Wind can be a sneaky destroyer, especially with the smaller, lighter models that pop up or fold away. Those things catch the breeze like a sail if they’re not sheltered. After my greenhouse took a tumble that scattered soil across the patio and broke half my pots, I started scouting for natural windbreaks. A solid fence, the side of a shed, or even dense shrubs work wonders without blocking too much sun. Just make sure the barrier isn’t so close that it creates a dead-air pocket where humidity builds up and invites mold. Drainage matters too. I once placed mine in a slight dip after a rainstorm, and water pooled underneath, making the base soggy and encouraging slugs to move in like they owned the place. Pick level ground or build it up with a few concrete blocks or treated lumber to create a stable platform. It doesn’t have to be perfect engineering—just enough to keep everything from shifting or flooding.
Accessibility is something I wish I’d thought about sooner. When my greenhouse was tucked at the far end of the yard, checking on it during a downpour or grabbing the watering can meant getting soaked myself. Now it’s right outside the back door, close to the hose bib and an outdoor outlet for a fan if needed. That convenience means I actually tend to it daily instead of putting it off. Also, steer clear of big trees. Not only do they drop leaves and twigs that clog the roof and block light, but their roots can creep under and heave the whole structure over time. One friend of mine ignored this and ended up with a cracked panel after a maple root pushed upward during a wet spring. If trees are unavoidable, plan on regular cleaning and maybe root barriers.
Take your time observing the spot before committing. Spend a few days noting where shadows fall at different hours. I use sticks poked in the ground to mark sun patterns—low-tech but effective. In winter, the sun sits lower, so what works in summer might need tweaking for year-round use. For hot climates, consider adding a bit of afternoon shade naturally or with a temporary screen. The payoff is huge: plants grow stronger, more evenly, and you spend less time fighting environmental stress. This one decision alone has probably saved me more headaches than all the others combined. Once the location feels right, you’re ready to move on to setting everything up properly, which leads straight into the next tip.
The second easy tip revolves around selecting and properly anchoring your mini greenhouse so it lasts more than one season. I started with the cheapest pop-up model I could find, figuring it’d be temporary while I tested the waters. It lasted one summer before the zippers failed and the fabric tore in a windstorm. Lesson learned—quality in the frame and covering makes all the difference, even for mini sizes. Look for sturdy aluminum or powder-coated steel frames rather than flimsy plastic ones that snap under weight. The covering should be UV-resistant polyethylene or polycarbonate panels that won’t yellow and crack after a year in the sun. I upgraded to a walk-in style with rigid panels after that first failure, and it’s still going strong after four seasons with only minor tweaks.
Size is worth thinking about carefully. It’s tempting to grab the smallest one to save space and money, but trust me, you’ll outgrow it faster than you expect. My current 4×6 foot model feels just right now, but early on I crammed too much in and ended up with overcrowded plants competing for air and light. If you can swing it, go a bit bigger than you think you need—extra shelves mean you can start more seeds or overwinter a few tender perennials without everything feeling chaotic. For really tight spaces, those shelf-style mini greenhouses that sit on a table work great for herbs and propagation, but they limit what you can grow long-term.
Anchoring is non-negotiable, especially if you live anywhere with occasional gusty weather. Those little ground stakes that come with kits are okay for calm days but laughable in anything over twenty miles an hour. I reinforce mine with heavy-duty tent stakes driven deep, plus sandbags or bricks placed along the base. For a more permanent feel, I built a simple foundation using concrete pavers laid in a rectangle, leveled with a spirit tool I borrowed from a neighbor. It raised the whole thing a few inches, improved drainage, and gave me peace of mind during storms. If you’re handy, pressure-treated lumber framed into a base works too and adds height for easier access without bending over constantly.
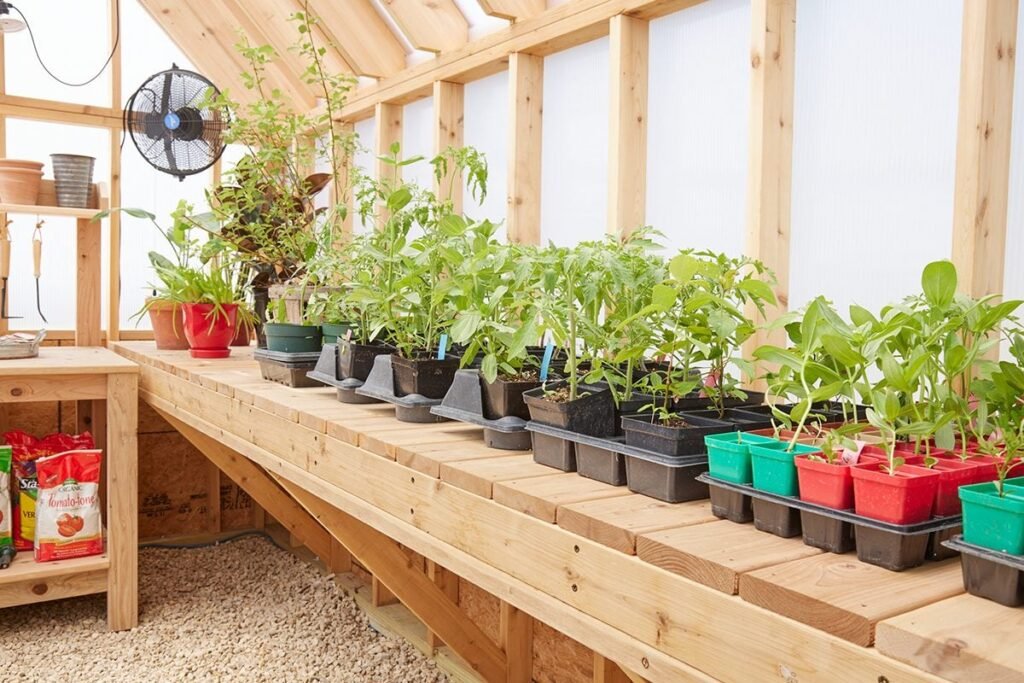
Inside setup matters just as much. I line the floor with landscape fabric topped with pea gravel for drainage and to keep weeds out—nothing worse than grass poking up between your pots. Shelves are a must; I use adjustable wire ones so air circulates underneath and water drains freely. Avoid solid wood if possible because it holds moisture and can rot or harbor bugs. Position taller plants toward the back or north side so they don’t shade everything else. One trick I picked up is hanging small hooks from the frame for tools or twine—keeps the floor clear and everything within reach.
Don’t forget about securing doors and vents. Loose flaps let pests in and heat escape at night. I added simple clips and weather stripping from the hardware store, and it made the environment much more stable. Budget-wise, you don’t need top-of-the-line right away. Start with a decent kit around fifty to two hundred dollars depending on size, then invest in upgrades as you go. My progression from cheap pop-up to a more solid model cost less overall than replacing failed plants season after season. The key is treating the greenhouse like a real investment in your gardening hobby rather than a disposable gadget. Get this part right, and the structure will support everything else beautifully, setting you up for the soil and planting details in tip three.
Preparing the right growing medium inside your mini greenhouse is tip number three, and it’s one I used to gloss over until my seedlings kept struggling despite good light and water. Regular garden soil is a no-go because it compacts easily in the confined space, drains poorly, and often brings in weed seeds or pathogens. Instead, I mix my own blend that drains well yet holds enough moisture and nutrients for young plants. A basic recipe I swear by starts with equal parts peat moss or coco coir for structure and water retention, perlite or vermiculite for aeration, and compost or worm castings for fertility. For seed starting, I go heavier on the perlite—about fifty percent—to prevent damping off, that sneaky fungal issue that wiped out my early attempts.
I sterilize the mix sometimes by baking it in the oven at low heat for half an hour, especially if reusing from previous seasons. It kills off any lingering spores without chemicals. For larger pots or grow bags inside the greenhouse, I add a bit more compost and maybe some slow-release organic fertilizer pellets. Last year I grew cherry tomatoes in fabric bags filled with this mix, and they produced twice as many fruits as my outdoor ones because the roots stayed warm and consistent. The bags also allow better airflow around the root zone, which is crucial in humid enclosed spaces.
Test the pH if you’re serious—most veggies like it between 6 and 7. I use a cheap soil test kit from the garden center and adjust with a sprinkle of lime for acidity or sulfur if it’s too alkaline. Over time, I’ve learned to refresh the top layer of mix between plantings rather than dumping everything. It saves money and maintains the beneficial microbes that help plants fight off disease naturally. One mistake I made early was packing the medium too tightly when filling pots. Air pockets are your friend; I gently tap the pots on the table to settle without compressing.
For different plants, tweak the ratios. Succulents or herbs that hate wet feet get extra perlite, while thirsty leafy greens like lettuce appreciate more coir for moisture. I keep separate batches labeled in buckets so I don’t mix them up. In hotter weather, the mix dries out faster inside the greenhouse, so I mulch the surface with a thin layer of shredded bark to retain moisture without inviting rot. Watching how the plants respond has been eye-opening—strong, vibrant growth versus yellowing leaves tells me immediately if the medium needs tweaking.
This preparation step pays off in healthier roots and fewer problems later. I’ve had trays of seedlings that germinated in three days instead of a week once I nailed the mix. It’s not glamorous, but spending an afternoon mixing soil properly means weeks of worry-free growing afterward. Combine this with good location and structure, and your plants have the best possible start before we even talk about air movement in the next tip.
Tip four focuses on ventilation, which might sound basic but is the secret sauce that keeps everything from turning into a steamy, disease-ridden box. Greenhouses trap heat and moisture beautifully, but without fresh air exchange, that same environment breeds mold, mildew, and weak plants. I learned this after a humid spell when powdery mildew spread across my zucchini leaves like white dust. Opening the door and adding a small fan changed everything. Even on mild days, I crack the vents or roll up the sides for at least a couple of hours to let stale air out and bring in fresh.
For mini setups, simple solutions work best. Many come with built-in zippered doors and roof vents—use them daily. I added inexpensive clip-on oscillating fans powered by a small solar panel on top; they run whenever the sun shines and keep air moving without any electricity bill. Position one low to pull cool air in and another higher to push hot air out. Cross ventilation is ideal, so align openings on opposite sides when possible. In still weather, I manually prop things open with sticks or use automatic vent openers that expand with heat—no batteries needed.
Humidity control ties in here too. I aim for around sixty to seventy percent inside, higher for propagation but lower for mature plants to avoid fungal issues. A cheap hygrometer helps me monitor; if it creeps too high, I increase airflow or water less. Damping down the floor with a quick spray on hot afternoons cools things through evaporation while improving circulation. One trick I picked up is spacing plants properly—not crowding them—so air can flow around each one. Overcrowding was another rookie error that led to tangled stems and hidden pest problems.
In cooler seasons, ventilation still matters to prevent condensation that drips onto leaves and promotes rot. I open vents briefly during the warmest part of the day and close them before evening chill sets in. For really cold snaps, I use bubble wrap insulation on the inside panels but leave small gaps for air. The difference is night and day: plants stay robust instead of leggy and stressed. I’ve grown basil that lasted through winter because consistent gentle airflow kept diseases at bay. Don’t underestimate this tip—poor ventilation has ruined more greenhouse attempts than bad soil or location ever did. Master it, and the rest becomes much easier.
Regulating temperature and humidity is my fifth tip, and it’s closely linked to ventilation but deserves its own focus because extremes can kill plants faster than anything. Mini greenhouses heat up quickly in sun and cool down just as fast at night, creating swings that stress everything inside. I use a simple digital thermometer-hygrometer combo with a remote sensor so I can check from indoors. Ideal ranges vary by plant, but generally seventy-five to eighty-five degrees during the day for most veggies, dropping no lower than fifty at night. When it gets too hot, shade cloth clipped over the roof drops the temperature ten to fifteen degrees without blocking all light. I have different percentages—thirty percent for light shade, fifty for hotter days.
Thermal mass helps stabilize things naturally. I place black-painted water jugs or barrels inside; they absorb heat during the day and release it slowly after sunset. In my small setup, even a few gallon jugs make a noticeable difference on chilly evenings. For extra warmth in winter, I wrap the outside with old blankets or use low-wattage heating mats under seed trays. But safety first—never use anything that could tip or overheat unattended. In summer, besides shade and ventilation, I mist the paths lightly in the morning to cool the air through evaporation.
Humidity swings are tricky too. Too low and leaves crisp; too high and fungus thrives. I monitor daily and adjust by watering in the morning only, so excess evaporates during the day. Grouping plants with similar needs helps—thirsty ones together, drought-tolerant ones apart. Last summer during a heatwave, my thermometer hit ninety-eight inside before I added extra shade and ran the fan constantly. The peppers pulled through but reminded me to check more often during extremes.
For beginners, start simple: observe patterns over a week and note what works. I keep a little notebook by the greenhouse door logging highs, lows, and any issues. It helps spot trends, like how south winds always bring drier air. Over time, you’ll develop an intuition for when to tweak something. This tip has let me push growing seasons earlier and later than my neighbors without fancy equipment. Steady conditions mean stronger plants, better yields, and less frustration.
Watering wisely comes in at tip six, and it’s surprisingly easy to mess up in a mini greenhouse because the enclosed space changes everything about evaporation and moisture retention. I used to water whenever the soil looked dry on top, which led to soggy roots and yellow leaves more times than I care to admit. Now I check deeper—stick my finger an inch or two into the mix. If it’s still damp, wait. Bottom watering is my go-to for seedlings: I set trays in shallow water for twenty minutes so roots drink from below without wetting leaves.
For larger plants, I use a long-spout watering can to target the base directly, avoiding foliage that could invite mildew. Drip irrigation kits for small setups are inexpensive and deliver water slowly right to the roots—perfect for consistent moisture without guesswork. I run mine on a simple timer or just by hand most days. In hot weather, check twice daily because things dry out faster than you expect, but on cloudy days, cut back because humidity keeps the soil moist longer.
Overwatering is the bigger danger in greenhouses. Excess moisture plus warmth equals root rot city. I always ensure pots have drainage holes and never let water sit in saucers for more than an hour. Mulching the soil surface with straw or bark helps retain even moisture and reduces evaporation spikes. One season I experimented with self-watering containers inside the greenhouse, and they worked great for vacations—wick systems pull water as needed without flooding.
Pay attention to plant signals too. Wilting in the heat might mean temporary dryness even if soil is moist; a quick mist and shade fixes it. I water early in the day so any splash on leaves dries before evening. This simple habit has cut my disease problems in half. The goal is consistent moisture without extremes—moist but never soggy. Once you dial this in, combined with the other tips, your plants practically take care of themselves.
Finally, tip seven is all about staying ahead of pests and diseases through simple prevention and monitoring. Mini greenhouses can become cozy havens for bugs if you’re not careful, but proactive steps keep issues minor. I inspect plants every time I visit—lifting leaves, checking stems—for early signs like aphids clustering or whiteflies fluttering. A strong spray of water from the hose dislodges most soft-bodied pests before they multiply. For stubborn ones, I use insecticidal soap or neem oil, both safe and effective inside enclosed spaces.
Beneficial insects are welcome guests. I release ladybugs a couple times a season; they patrol for aphids like tiny guardians. Sticky traps hung discreetly catch flying pests without chemicals. Cleanliness matters hugely—remove dead leaves promptly, disinfect tools with diluted vinegar between uses, and avoid bringing in outdoor soil that might carry eggs or spores. At season’s end, I wash down the entire interior with mild soap and let it air out thoroughly.
Diseases like blight or mildew get prevented mostly through the ventilation and spacing I’ve already mentioned, but if something appears, I isolate the plant immediately and prune affected parts with sterilized shears. Companion planting works wonders too—basil near tomatoes helps repel some pests naturally. I keep a small spray bottle of homemade garlic-chili tea for quick treatment; it smells strong but deters many critters without harming plants.
Regular maintenance ties it all together: tighten screws on the frame every few months, replace worn panels before leaks start, and rotate crops in pots to keep soil healthy. I journal what worked and what didn’t each season, so mistakes don’t repeat. This vigilance means my greenhouse stays productive with minimal intervention. Pests and diseases used to feel overwhelming, but now they’re just occasional bumps I handle quickly.
Putting all seven tips together has turned my mini greenhouse into a reliable, joyful part of my routine. I’ve harvested more fresh food, started stronger transplants for the main garden, and even gifted overflowing trays of seedlings to friends. It doesn’t require perfect conditions or endless hours—just consistent attention to these basics. If you’re just starting, begin with one or two tips and build from there. Experiment, observe, and adjust to your own space and climate. Gardening this way feels less like work and more like play, with delicious rewards. Give it a try—you might find yourself checking on your little greenhouse every morning with a smile, just like I do. The plants will thank you, and so will your plate.