Small pots. Big problems. Sound familiar?
If you’ve ever seen a plant slowly droop and turn yellow, or just refuse to grow in a little pot — you’re not alone. This is a struggle that millions of gardeners reckon with every year. The frustrating part? Many do not realize that the plant isn’t the issue. It’s how they use the pot.
But here’s the good news: Little pots can actually be great. All you need is to know a few tricks of the trade that most beginning gardeners never learn.
Grow herbs on a kitchen windowsill or flowers on your balcony or succulents on your desk — here are the 8 tried-and-true tiny pot tricks that will change the way you garden. For good.
Let’s dig in.
Tip #1 — Choose the Right Material for Your Pot First
The average person chooses whatever pot looks pretty. Big mistake.
The material that makes up your pot has a bearing on everything — how quickly soil dries out, how warm the roots stay, and how much stress your plant endures each day.
Here’s a quick rundown of the most common materials in tiny pots:
| Pot Material | Dries Out | Best For | Watch Out For |
|---|---|---|---|
| Terracotta (clay) | Fast | Succulents, cacti, herbs | Needs frequent watering |
| Plastic | Slow | Tropical plants, ferns | May cause root rot if overwatered |
| Ceramic (glazed) | Medium | Most houseplants | Heavy, can crack in frost |
| Metal | Very fast | Short-term display only | Heats up quickly in sun |
| Fabric grow bags | Very fast | Vegetables, herbs | Requires daily watering in summer |
When it comes to tiny pots in particular, terracotta is typically the most foolproof option. It breathes. It sucks up extra moisture from roots. And it prevents the No. 1 little pot killer — overwatering.
Pot it Up According to the Plant’s Personality
Cacti and succulents love terracotta because they despise being in wet soil. Ferns and tropical plants prefer plastic or glazed ceramic, since they like their moisture to linger longer.
General rule: Plants that prefer dry, well-drained soil = breathable pots. Moisture-loving plants = sealed pots.
Trick #2 — The Drainage Layer Myth (And What to Do Instead)
For decades, gardeners were advised to use a layer of gravel or pebbles at the bottom of small pots for “drainage.” It sounds logical. It’s actually wrong.
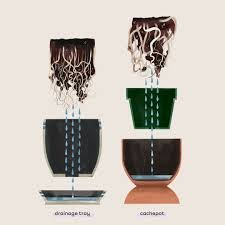
Studies from the University of Illinois found that adding gravel at the bottom of a pot elevates the water table in the soil — roots thus remain wetter, not drier. This results in more root rot, not less.
So what should you do instead?
Drainage in Tiny Pots: The Right Way
Step 1: Use a container with at least one drainage hole. No exceptions.
Step 2: Place a small piece of mesh, coffee filter, or shard of pottery over the drainage hole. That prevents soil from spilling out while not blocking water.
Step 3: Choose a good potting mix. In small pots, use regular potting soil with 20–30% perlite. Perlite is those tiny white dots you’ll see in your bag of soil — they create air pockets and allow water to flow through faster.
Step 4: Raise your pot a little off the ground with pot feet or a small trivet. This allows the water to drain rather than pool underneath.
That’s it. No gravel layer needed.
Trick #3 — The “Lift Test” to Know When to Water
Tiny pots dry out fast. But they can also appear deceptively moist on the surface while being completely sodden below. Poking your finger one inch into the soil only reveals so much.
The best method? The lift test.
How the Lift Test Works
After watering your pot, pick it up immediately. Notice how heavy it feels. Then pick it up a day or two later. Feel the difference? A dry pot is far lighter than a wet one.
Soon you’ll develop an instinct for exactly when your plant needs watering — just pick it up and feel whether it’s heavy or light. No apps. No moisture meters. No guessing.
This trick is particularly effective for:
- Succulents and cacti
- Herbs like rosemary and thyme
- Miniature orchids in small decorative pots
For heavy ceramic pots that are difficult to lift, use a wooden chopstick or skewer. Push it two inches into the soil, then pull it out. Dry soil = nothing sticks. Moist soil = soil clings to the stick.
Watering Frequency Guide for Small Pots
| Season | Sunny Indoor Spot | Shaded Indoor Spot | Outdoors (Summer) |
|---|---|---|---|
| Spring | Every 3–4 days | Every 5–6 days | Every 2–3 days |
| Summer | Every 2–3 days | Every 4–5 days | Daily or every other day |
| Autumn | Every 5–7 days | Every 7–10 days | Every 4–5 days |
| Winter | Every 10–14 days | Every 14–21 days | Rarely needed |
These are rough guides — always do the lift test first.
Trick #4 — Feed Small, Feed Often (The Tiny Pot Fertilizing Secret)
Here’s something most gardeners get wrong. They either never fertilize their little pot plants, or they pour in a full dose of fertilizer and wonder why the leaves burn.
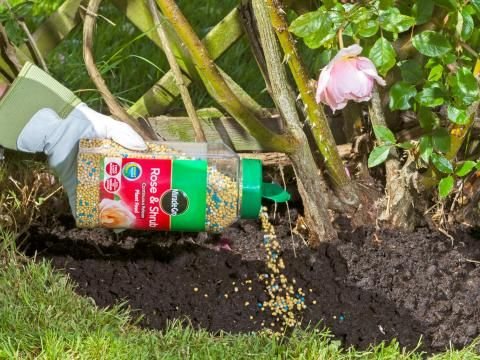
Tiny pots hold less soil. Less soil means fewer nutrients. And every time you water, those nutrients get flushed out faster.
The answer is straightforward: fertilize with a diluted mix more frequently.
The Half-Dose, Double-Frequency Method
Rather than applying the full recommended dose of liquid fertilizer once a month, apply half the dose every two weeks during the growing season (spring through early autumn).
It maintains a steady, gentle source of nutrients for your plant. It avoids the “feast or famine” cycle that puts plants in small containers under stress.
Top fertilizers for small pot plants:
- Liquid seaweed — mild, will not scorch, great for herbs
- Balanced liquid feed (10-10-10 or 20-20-20) — great for leafy plants
- Tomato feed (high potassium) — ideal for flowering plants and fruiting herbs
- Diluted worm castings — slow release, organic, safe for all plants
Signs Your Little Pot Plant Needs Feeding
- Pale or yellow leaves (especially the older ones at the bottom)
- Very slow or zero growth during spring/summer
- Flowers dropping before fully opening
- Water-repellent soil that dries out really quickly
Stop fertilizing in late autumn and winter. The majority of plants are dormant during this period and do not require additional nutrients.
Trick #5 — Go Root Bound on Purpose (Yes, Seriously)
The average person gets scared when roots appear through the drainage hole. “Time to repot!” they shout.
Not so fast.
In fact, some plants actually thrive when they are somewhat root bound. A root bound plant is one where the roots have occupied most of the pot and are beginning to circle at the bottom.
Plants That Prefer to Be Root Bound
- Peace lilies
- Spider plants
- Aloe vera
- Christmas cactus
- Boston ferns
- African violets
When they’re a bit crowded, these plants invest their energy in producing more flowers and offshoots instead of constantly searching for fresh root space. It’s a survival mechanism — they bloom before matters grow dire.
When Root Bound Becomes a Real Problem
There are signs that a plant has crossed from “pleasantly crowded” to “genuinely stressed”:
- Water flows directly through the pot without being absorbed
- Roots are emerging through the surface of the soil
- Cracks or bulges in the pot due to root pressure
- Despite excellent care, growth has come to a complete halt
- The soil dries out within a few hours of watering
If you see these signs, it’s time to size up — but just by one pot size. Transplant to a 6-inch pot from a 4-inch one. Jumping straight into a giant pot encourages root rot because the extra soil holds excess moisture the plant isn’t able to use yet.
Trick #6 — Water Smarter With the “Wicking Method”
If you have a habit of forgetting to water, going on holiday, or just want something low-maintenance — the wicking method is your best friend for tiny pots.
How to Set Up a Self-Watering Wick System
What you need:
- A small container (a cup, jar, or even a plastic bottle)
- Cotton rope, thick cotton shoelace, or strips cut from an old cotton t-shirt
Steps:
- Take a length of cotton rope around 30–40cm long.
- Push one end 5–7cm into the soil near the root zone of your tiny pot.
- Insert the other end into your water reservoir, positioned just below the pot.
- The cotton absorbs water and slowly wicks it up into the soil through capillary action.
Your plant is able to sip water at its own pace. The soil never floods. It never completely dries out. It’s genius in its simplicity.
This technique is particularly effective for:
- Basil and mint (both of which hate irregular watering)
- Little African violets (which dislike water on their leaves)
- Any small pot plant in a warm, sunny location that dries out quickly
Wick Material Comparison
| Material | Water Flow Speed | Durability | Cost |
|---|---|---|---|
| Cotton rope | Slow & steady | 2–3 months | Low |
| Nylon rope | Fast | 6+ months | Low |
| Cotton t-shirt strips | Medium | 1–2 months | Free |
| Shoelace (cotton) | Medium | 2–3 months | Free |
Wicks should be replaced every couple of months as they can develop mold or mineral build-up.
Tip #7 — Group Your Small Pots Together to Form a Microclimate
A single little pot sitting alone on a windowsill loses moisture fast. The air around it dries out. Temperature swings hit hard. The plant struggles.
But group five or six small pots together?
Magic happens.
Why Clustering Works
Plants release moisture through their leaves — a process known as transpiration. When you group plants together, that moisture accumulates in the air around them. This creates a slightly more humid, stable environment that benefits every plant in the cluster.
It also reduces temperature swings. Together, the plants retain heat better than any of them does alone.
And as a bonus? It just looks absolutely stunning. If you’re working with outdoor spaces, Small Balcony Garden is a fantastic resource for creative ideas on grouping and displaying tiny pots in compact areas.
How to Group Small Pots for Maximum Impact
Vary the heights. Prop some pots up higher with books, small crates, or wooden blocks. This adds visual depth and allows each plant to receive light evenly.
Mix textures and leaf shapes. Combine spiky succulents with round-leaved sedums. Nestle feathery ferns next to bold-leafed pothos cuttings. Contrast makes the display interesting.
Keep similar watering needs together. Don’t place a cactus next to a moisture-loving fern. Your watering schedule will become a nightmare.
Leave a little breathing room. Don’t pack pots so tightly that air can’t get through at all. Adequate airflow prevents mold and pests.
Trick #8 — Refresh the Soil Without Repotting (The Top-Dressing Trick)
Repotting is stressful — for the plant and for you. But soil in small pots wears out surprisingly quickly. It compacts. It becomes unable to drain properly. Nutrients get stripped out. And eventually the plant suffers.
The answer isn’t always a bigger pot. Sometimes you just need fresh soil.
How to Top-Dress a Tiny Pot
What it is: Replacing the top 2–4cm of old, compacted soil with fresh potting mix.
When to do it: Once a year in early spring, right before the growing season gets under way.
How to do it:
- Using a spoon or your fingers, gently lift away the top layer of soil. Be careful around the root zone.
- If there is a layer of white crust (mineral deposits from tap water), remove that too.
- Add a thin layer of fresh potting mix — possibly mixed with some slow-release granular fertilizer if you like.
- Lightly water to settle everything in.
That’s it. Your plant receives a nutrient boost, better drainage, and a fresh start — without the trauma of being pulled out of the ground.
According to the RHS (Royal Horticultural Society), top-dressing is one of the most effective and low-stress ways to maintain container plant health year after year.
Boost the Top-Dressing With These Add-Ins
| Add-In | Benefit | Amount per Small Pot |
|---|---|---|
| Worm castings | Gentle nutrients + beneficial microbes | 1–2 tablespoons |
| Perlite | Better drainage and aeration | Mix into new soil at 20% |
| Biochar | Retains nutrients, improves structure | 1 teaspoon |
| Slow-release granules | Feeds plant for 3–6 months | Follow packet instructions |
Top-dressing is particularly powerful for plants that you’d prefer not to repot — large succulents, well-established herbs, or those plants that thrive when root bound.
Putting It All Together — Your Tiny Pot Plan of Attack
Here’s a quick summary of all 8 tricks to refer back to anytime:
| Trick | Quick Summary |
|---|---|
| 1. Choose the right material | Match pot material to plant’s water needs |
| 2. Skip the gravel layer | Use mesh + perlite mix instead |
| 3. Master the lift test | Weigh your pot to judge moisture |
| 4. Feed small, feed often | Half dose, twice the frequency |
| 5. Go root bound on purpose | Let the right plants settle in comfortably |
| 6. Use the wicking method | Let plants drink at their own pace |
| 7. Cluster your pots | Create a humidity microclimate |
| 8. Top-dress instead of repot | Refresh soil without disturbing roots |
None of these tricks require pricey tools or hard-to-find products. Most of them cost nothing at all — just a shift in how you think about tiny pot gardening.
Frequently Asked Questions About Tiny Pot Tricks
Q: Should I water more often if my plants are in smaller pots as opposed to bigger pots? In general, plants in small pots require watering about twice as often as those growing in larger containers. The smaller amount of soil dries out far more quickly. Only water when the lift test suggests doing so — not on a strict watering schedule.
Q: Can I grow vegetables in small pots? Yes — but select “dwarf” or compact varieties bred for container cultivation. Radishes, lettuce, chives, dwarf basil, and cherry tomatoes (in slightly larger tiny pots) all thrive. Use the wicking method to maintain consistent moisture levels.
Q: My little potted plant keeps dying no matter what I do. What am I missing? The most common causes are: improper pot material, no drainage hole, overwatering, improper lighting levels, or soil that has fully decomposed. Start fresh with a clean pot and new potting mix that includes perlite, and make sure your plant is getting the right light.
Q: Can I use garden soil in small pots? No. Garden soil compacts very quickly in containers, impedes drainage, and often brings pests or diseases along with it. Always use a proper potting mix — and for tiny pots, add extra perlite to keep it light and airy.
Q: Do tiny pots need fertilizer in winter? Not usually. During the winter season, many plants enter a period of slow growth. Fertilizing at that time can result in weak, leggy growth or even damage roots. Do not start feeding again until you see new growth in spring.
Q: Why does my pot soil become hard and crusty, and how do I stop it? This often occurs when soil becomes too dry, compacted, or hydrophobic. Soak the pot in a basin of water for 20–30 minutes until the soil fully rehydrates. Then add a fresh layer of potting mix on top. Going forward, water before the soil completely dries out.
Q: Is it okay to reuse old potting soil from small pots? You can mix old soil into garden beds or compost, but do not reuse it as-is in small pots. Used potting soil is typically compacted, nutrient-depleted, and potentially diseased. Fresh soil always performs better in tiny pots.
The Bottom Line
Small pots needn’t mean small results.
With the right material, the right soil setup, better watering habits, and a few simple tricks — small containers can grow truly thriving plants. Whether it be a lush herb collection, a grouping of beautiful succulents, or colourful flowering plants — little pots can do it all.
These 8 tiny pot tricks are not rocket science. They’re not expensive. And they’re not just theoretical — they’re tried, practical techniques that real gardeners use day in and day out.
Start with only one or two tricks. Notice the difference. Then layer in the rest.
Small pots. Big results. You’ve got this.