Ever look at a beautiful patio full of overflowing flower pots and think “How do they do that?”
Container gardening looks simple. Throw some dirt in a pot, plop a plant into it, water — that’s it. But if you’ve ever ended up with droopy, sad, half-dead plants a few weeks in, you know there’s more to the story below ground.
The reality is there are a few key secrets that successful container gardening runs on. Once you recognize them, everything makes sense. Your plants thrive. Your pots look amazing. And you quit buying plants that die before summer even starts.
This guide distills 6 proven container tricks that experienced gardeners know — whether they’re growing tomatoes on a small balcony or packing color onto a front porch. These aren’t vague tips. These are concrete steps you can take that produce real-world results.
Let’s get into it.
Secret #1 — The Right Container Makes All the Difference
For most novices, the choice of a pot is aesthetic. That’s not incorrect — aesthetics are important. But the container itself is a huge part of whether or not your plant thrives.
Bigger Is Better Than You Think
A very small pot constricts roots. A pot that’s too big has too much wet soil, which means you get root rot.
Here’s a simple size guide:
| Plant Type | Minimum Container Size |
|---|---|
| Herbs (basil, mint, parsley) | 6–8 inches |
| Lettuce / Greens | 8–12 inches |
| Peppers / Eggplant | 12–14 inches |
| Tomatoes (bush varieties) | 14–16 inches |
| Tomatoes (indeterminate) | 20+ inches |
| Dwarf fruit trees | 18–24 inches |
I’ll always err on the side of one size up. Roots need room to spread.
Material Makes a Difference
Different types of pots have very different behaviors in your garden.
Terra cotta: Breathes well, dries out fast — good for succulents, bad for thirsty plants like tomatoes.
Plastic: Holds moisture longer, light and inexpensive — good for veg and annuals.
Fabric grow bags: Good drainage, and air prunes roots — a really solid choice for vegetables.
Glazed ceramic: Lovely, retains moisture well but kind of heavy, can crack in freezing temps.
Wood: Insulates roots from hot and cold — perfect for long-term plantings.
Don’t Forget Drainage Holes
This one gets ignored constantly. If your container does not have drainage holes, the water collects at the base and rots the roots. No exceptions — all containers need at least one good drainage hole. If your favorite decorative pot doesn’t provide a hole for drainage, use it as a cachepot (a decorative outer shell) and set inside of it a plastic pot with holes.
Secret #2 — Don’t Use Regular Garden Soil, Get the Right Mix
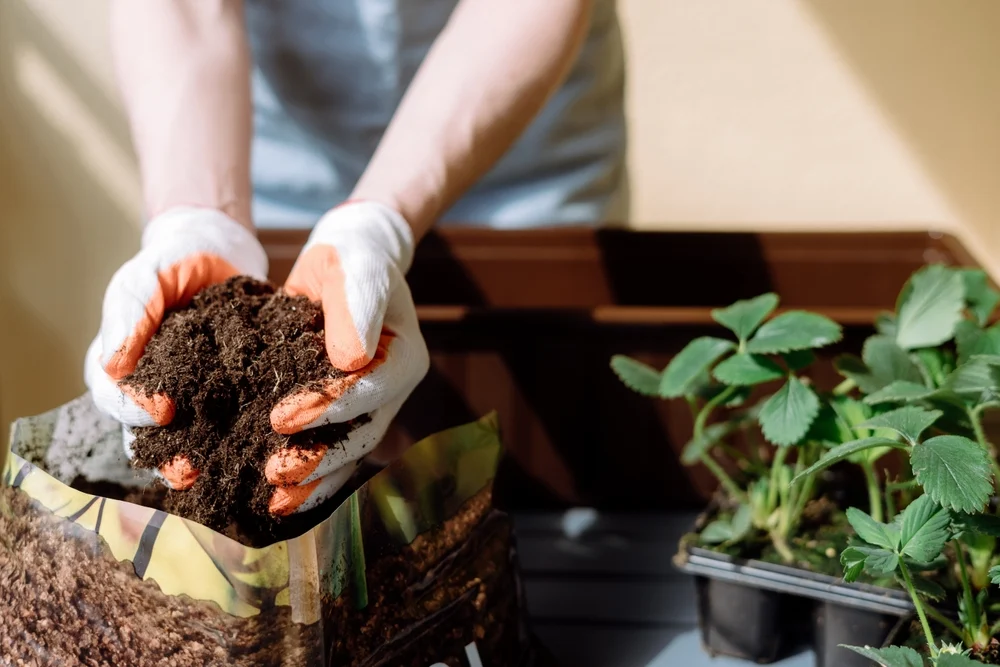
This is where many container gardens go south right from the outset.
Others scrape dirt from their backyards or buy the cheapest bag of earth at the local hardware store. Then they complain their plants are failing.
Garden soil is too heavy for containers. It compacts over the years, fills drainage holes, and smothers roots. In the dirt, worms and microorganisms continuously break it into smaller particles. That doesn’t happen in a pot.
What You Really Need: A Good Potting Mix
Consider a premium potting mix (not potting soil — it’s not the same). A good blend is airy and fluffy but drains well while still holding some moisture.
The ideal container mix contains:
- Peat moss or coco coir — retains moisture without compaction
- Perlite or vermiculite — to promote drainage and aeration
- Compost — boosts nutrients and beneficial microbes
- Bark fines — improves structure
The DIY Super Mix
Want to level up? Mix your own:
- 60% high-quality potting mix
- 20% perlite
- 20% worm castings or compost
It drains well, feeds your plants slowly, and keeps roots happy all season.
Refresh Your Mix Every Year
Potting mix decomposes over time. It compacts and loses nutrients after one full growing season. Replace it entirely or refresh it by mixing in compost and fresh perlite each spring.
Secret #3 — Water Smarter, Not More
Watering is where most container gardeners go wrong — either over- or under-watering.

Plants in containers dry out much more quickly than those in garden beds. On a warm summer day, a small pot can dry out in as little as a few hours. But the #1 killer of container plants is actually overwatering.
The Finger Test — Your Most Effective Tool
Before you give a plant water, plunge your finger an inch into the soil. If it feels:
- Wet or cool → Don’t water yet
- Slightly moist → Check again in a few hours
- Dry → Time to water
It takes two seconds and saves plants every time.
How to Water Properly
Don’t just sprinkle the surface. Water thoroughly and deeply until water drains freely from the drainage holes. Then stop. This helps roots grow down and reinforces the plant.
Smart Watering Schedule Tips
| Season | Watering Frequency (General) |
|---|---|
| Spring | Every 2–3 days |
| Summer (hot/dry) | Daily or every other day |
| Fall | Every 3–4 days |
| Winter (indoors) | Weekly or less |
Note: These are general guidelines. Always check soil moisture before watering.
Self-Watering Containers — Worth It?
Absolutely yes. Self-watering pots have a reservoir at the bottom for plants to draw from as and when they need it. They’re great for busy people, vacations and hot weather. When it comes to dry stretches, plants in self-watering containers always do better than those potted in regular pots.
Secret #4 — Proper Diet and Plenty of It
Here’s something nearly all beginners overlook: plants in containers need regular fertilizing.
In the ground, plants can reach out with roots to seek nutrients. In a container, they’re working with whatever that pot allows. With each watering, nutrients leach out through the drainage holes. Even a potting mix rich in nutrients runs short within a few weeks.
The 2 Types of Fertilizer You Should Know
Slow-release granular fertilizer: These small pellets release nutrients slowly over a few months. Mix them into your potting soil at the beginning of the season. They are low-maintenance and offer a stable foundation of nutrients.
Liquid fertilizer: These are quickly absorbed and feed plants rapidly. Apply them every 1–2 weeks throughout the growing season to replenish nutrients. Good options are fish emulsion, seaweed extract and balanced synthetics like 10-10-10.
A Simple Fertilizing Schedule
| Plant Type | Suggested Approach |
|---|---|
| Flowering annuals | Liquid fertilizer every 7–10 days |
| Vegetables | Balanced slow-release + liquid every 2 weeks |
| Herbs | Low feed — liquid every 3–4 weeks |
| Succulents | Minimal — once a month during growing season |
| Foliage plants | Every 2–3 weeks using balanced liquid |
Signs Your Container Plant Is Hungry
- Yellowing lower leaves
- Slow or stunted growth
- Pale, washed-out color
- Fewer flowers than expected
If you notice these, begin a regular fertilizing schedule immediately. Most plants respond quickly once they’re nourished properly.
Secret #5 — The Art of Plant Combinations (Thriller, Filler, Spiller)
Just this one design principle will completely alter the way your containers look.
This formula has been used by landscape designers and professional gardeners for decades. It works for decorative pots, window boxes, hanging baskets — any container where you want visual impact.
The Formula: Thriller + Filler + Spiller
Thriller — The main course. A tall, upright statement plant that captures the eye. Think ornamental grasses, tall salvias, canna lilies or a spike plant for maximum drama.
Filler — The supporting cast. Medium-height, bushy plants that fill space around the thriller, making for a full and lush look. Something like petunias, impatiens, calibrachoa or sweet potato vine.
Spiller — The finishing touch. Trailing plants that spill over the rim of the pot and soften the sharp lines of the container. Something that trails, like lobelia, bacopa, creeping jenny or string of pearls.
Example Combos That Work Beautifully
| Container Style | Thriller | Filler | Spiller |
|---|---|---|---|
| Sunny & Colorful | Tall Salvia | Petunias | Trailing Verbena |
| Tropical Vibe | Canna Lily | Caladium | Sweet Potato Vine |
| Cottage Garden | Foxglove | Alyssum | Bacopa |
| Edible Garden | Kale or Chard | Herbs (basil, parsley) | Trailing Nasturtium |
| Shade Container | Ornamental Grass | Impatiens | Creeping Jenny |
Not Just About Looks — Consider Growing Conditions
Whatever plant combo you have must share similar needs. Don’t match a cactus with a fern. Group sun-lovers together, shade-lovers together. Group plants that have similar watering requirements. This simplifies maintenance whilst keeping all the plants in the pot thriving equally.
If you’re working with a small outdoor space, Small Balcony Garden is a fantastic resource packed with ideas for making the most of compact container setups — well worth a browse before you start planting.
Secret #6 — Focus on Placement, Sunlight and Microclimates
You could get all five of those secrets spot on. But if you place the wrong plant in the wrong spot, it will still struggle.
Mobility is one of the great advantages of container gardening — and one that most people completely ignore. You can move pots around. Use that power.
Read the Sun Before You Plant
Before you buy a single plant, spend a day observing how sunlight moves throughout your space. Note:
- Which areas receive full sun (6+ hours direct sun)
- Which areas get partial sun (3–6 hours)
- Which areas are in deep shade (less than 3 hours)
Then match plants to those conditions. This is obvious, but most people completely skip this step and wonder why their sun-loving tomatoes are miserable on a north-facing balcony.
Microclimate Magic — Hot Spots and Cool Spots
Each outdoor space has microclimates — small zones with slightly different temperatures and conditions.
South-facing walls soak up heat during the day and release it at night. Excellent for heat-loving plants such as peppers, tomatoes and herbs. Might need more frequent watering.
North-facing spots will be cool and more shaded. Ideal for ferns, hostas and cool-season greens such as lettuce and spinach.
Windy corners dry out containers quickly and can harm delicate plants. Opt for heavier pots so they don’t tip, and choose sturdier plants.
Paved surfaces get saddled with heat in summertime. Use pot feet or stands to elevate pots off the ground for air circulation and to prevent heat stress on roots.
The Container Advantage of Seasonal Shifting
As the seasons evolve, reposition your containers as needed.
In spring, most pots should move into full sun to spur rapid growth. In peak summer heat, sensitive plants like lettuce can be shifted to afternoon shade to prevent bolting. In fall, bring tender plants closer to the house for warmth and wind protection.
This kind of attentiveness is what sets average container gardeners apart from those whose patios look like magazine spreads.
According to the RHS (Royal Horticultural Society), choosing the right container and position is one of the most impactful decisions you can make for long-term plant health.
Putting It All Together — A Container Checklist by Season
Here’s how to apply all 6 secrets across the growing year:
Spring Setup
- Use the right size containers with proper drainage holes ✓
- Fill with fresh, high-quality potting mix ✓
- Incorporate slow-release granular fertilizer ✓
- Choose plants with the thriller-filler-spiller formula ✓
- Place containers according to sunlight mapping ✓
Summer Maintenance
- Check soil moisture daily in hot weather ✓
- Water thoroughly when the top inch is dry ✓
- Apply liquid fertilizer every 1–2 weeks ✓
- Deadhead (pinch off spent flowers) to promote reblooming ✓
- Move heat-sensitive plants to afternoon shade ✓
Fall Wind-Down
- Water less as temperatures drop ✓
- Stop fertilizing 4–6 weeks prior to first frost ✓
- Bring tender plants indoors before frost ✓
- Clean and store containers to avoid cracking ✓
Winter Planning
- Refresh or replace potting mix for indoor plants ✓
- Plan next year’s combinations ✓
- Order seeds and bulbs early ✓
Common Container Gardening Mistakes — And How to Avoid Them
Even with these secrets in hand, a few common mistakes trip people up:
Plant overcrowding — More plants do not equal more beauty. Crowded pots compete for nutrients and moisture. Give plants room to breathe.
Ignoring pot weight — A large ceramic pot full of damp soil can weigh more than 100 pounds. Consider this before filling a pot on a balcony or elevated deck.
Skipping the saucer — In hot weather, a saucer holds water and gives plants extra moisture. In rainy seasons, remove saucers to avoid waterlogging.
Reusing last year’s mix without refreshing — Old, compacted soil is one of the biggest reasons plants fail in year two.
Impulse plant buys — Always check the sun and water requirements on the tag before buying. No matter how well you treat it, a plant that needs full sun is not going to thrive on a shady porch.
FAQs About Container Gardening Secrets
Q: How often should I refresh the potting mix in my pots? A: In an ideal situation, you would replace or heavily amend your potting mix every 1–2 years. Every spring, add some compost and perlite to refresh your older mix and improve its structure.
Q: Can I grow different plants in the same container each season? A: Yes! All you have to do is scrub the container with a diluted bleach solution between plantings to avoid disease. Change the potting mix out and you’re good to go for a new planting.
Q: What is the best container material for a hot, sunny climate? A: Because they reflect heat, light-colored plastic or glazed ceramic does well in hot climates. Steer clear of dark-colored terra cotta in hot sun — it absorbs heat and can cook roots.
Q: Do I really need to fertilize if I used a premium potting mix? A: Yes. Most high-end mixes have starter fertilizer that’s good for maybe 4–6 weeks. Regular feeding is required to ensure healthy growth after this initial period.
Q: What should I do to stop gnats from taking over my container soil? A: Fungus gnats love moist topsoil. Do not water again until the top inch of soil is dry. In addition, you can use a layer of sand on the soil surface or apply a biological control such as Bacillus thuringiensis israelensis (BTi).
Q: Can you really grow vegetables in containers? A: Absolutely. Tomatoes, peppers, beans, lettuce, herbs and even cucumbers all grow well in containers if you provide the right pot size, soil mix, sunlight, water and fertilizer.
Q: What is the thriller-filler-spiller rule in simple terms? A: One tall dramatic plant (thriller), surrounded by medium bushy plants (filler), with trailing plants cascading over the edges (spiller). When combined they form a well-balanced, professional-looking container.
Final Thoughts
Container gardening is perhaps some of the most rewarding gardening you can do — whether you have an expansive backyard, a small balcony or just a sunny windowsill.
But, like anything worth doing, it pays off for those who master the basics.
The 6 container secrets covered in this guide — picking the right container, using proper potting mix, watering smartly, fertilizing regularly, combining plants strategically and placing them in the right spot — are the building blocks of every thriving container garden.
None of these are complicated. You don’t need a green thumb. All you have to know is what to do, and why.
This season, try one or two containers. Apply these principles. Watch what happens. You’ll be surprised how much a little knowledge helps.
Happy planting — your best container garden is only a pot away.