
Winter is coming. And your plants are not prepared.
Every year, gardeners helplessly watch as frost descends in the night and erases weeks — sometimes months — of labor. A cold snap hits. Leaves turn black. Stems collapse. And by morning, a flourishing garden seems like a disaster site.
Here’s the reality check, though: it doesn’t have to be that way.
Gardening in cold climates is not about luck. It’s about knowing a few of the right tricks ahead of time, before the temperature plummets. The gardeners who maintain beautiful, productive gardens in the depths of winter aren’t doing anything magical. They’re just prepared.
Whether you need to save potted plants on a balcony, herbs on a windowsill, or your vegetable patch from a bitter freeze — these 8 ultimate cold weather tricks will equip you with everything you need to strike back against winter.
Let’s get into it.
Trick #1 — Know Your Frost Dates (This One Number Changes Everything)
The first step — find your first and last frost dates.
This is the No. 1 key to cold weather gardening. Everything else — when to cover plants, when to bring them indoors, when to stop watering — hinges on this.
What Frost Dates Actually Mean
The first frost date is the average date in the fall when temperatures drop for the first time to 0°C (32°F) or less where you live. Your last frost date is the average spring date at which freezing temperatures cease.
These dates are averages calculated using decades of weather data. They aren’t ironclad — but they provide a firm window in which to work.
Your national weather service, local gardening centres, or web tools such as the Old Farmer’s Almanac frost date calculator can help you find your local frost dates.
How to Use Frost Dates in Your Winter Planning
| Frost Type | Temperature | What It Damages |
|---|---|---|
| Light frost | -1°C to 0°C (30–32°F) | Tender annuals, basil, impatiens |
| Moderate frost | -2°C to -4°C (25–29°F) | Most vegetables, dahlias, begonias |
| Hard frost | -5°C to -7°C (20–24°F) | Woody shrubs, most perennials |
| Severe freeze | Below -8°C (18°F) | Almost everything unprotected |
Once you have your dates, work backwards. If you normally get your first frost on October 15th, begin preparing in early October. Don’t wait for the forecast to call for frost — by then, it is often too late.
Trick #2 — Mulch Like You Mean It (The Free Frost Shield)
Mulch is perhaps the most potent cold weather weapon you possess. And most gardeners either don’t use enough — or don’t use it at all.
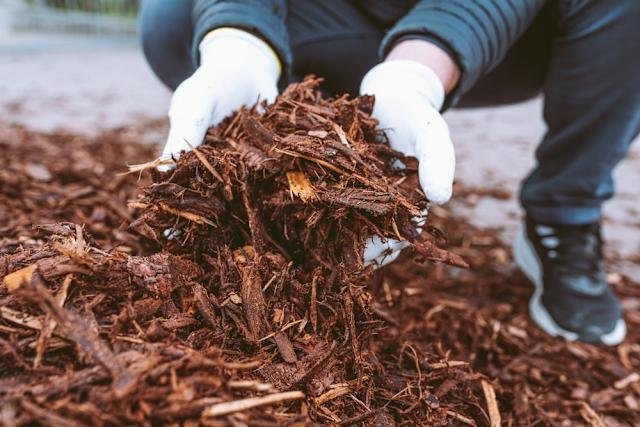
This is what mulch really does during winter: it keeps your soil cozy. It holds in warmth that the ground absorbs by day and gradually releases at night. It also helps maintain more stable soil temperatures and insulates roots from sudden freezes.
How Much Mulch Is Enough?
A minimum of 5–10cm (2–4 inches) of mulch is needed to protect against cold weather. In regions with harsher winters, go up to 15cm (6 inches) around sensitive plants.
The best mulching materials to prepare your garden for winter:
- Straw — good insulator, lightweight, inexpensive
- Shredded bark — slowly decomposes, neat appearance
- Fallen leaves — free, effective, widely available
- Compost — insulates while providing nutrients
- Pine needles — great for acid-loving plants such as blueberries
Where to Apply Mulch for the Best Protection
Lay down mulch at the base of plants — not on top of them. Keep it a couple of centimetres away from stems and trunks to avoid rot. The intent is to protect the root zone, not smother the plant itself.
For pots, mulch the surface of the soil inside the pot and insulate around the exterior of the pot with bubble wrap or hessian to protect roots from frost.
Trick #3 — The Cloche Trick (Simple, Cheap, Super Effective)
A cloche is just a cover. That’s it.
But having the right cover at the right time can mean the difference between a plant getting through winter or melting away overnight.
Cloches work by retaining warm air around individual plants. Like a mini-greenhouse, but for one plant at a time. They offer protection from frost, wind, and even heavy rain — all of which can harm plants sensitive to cold.
Cloche Options From Cheap to Cheaper
You don’t have to purchase fancy cloches. Some of the better ones cost nothing:
| Cloche Type | Cost | Best For | Ventilation Needed? |
|---|---|---|---|
| Plastic bottle (cut in half) | Free | Seedlings, small herbs | Yes — remove cap on warm days |
| Glass jar | Free | Individual small plants | Yes — lift off on warm days |
| Horticultural fleece tent | Low | Rows of plants, shrubs | No — fleece breathes naturally |
| Polycarbonate cloche | Medium | Repeated seasonal use | Yes — open to ventilate on warm days |
| Wire frame + fleece | Low | Larger plants and beds | No |
The Golden Rule of Cloches
Always ventilate on warm days. A cloche holds onto heat — which is wonderful at night. But on a sunny winter day, temperatures inside a cloche can climb quickly enough to cook your plant. On a sunny day, if the temperature reaches above 10°C (50°F), open or remove the cloche during daylight hours.
Trick #4 — Wrap Your Pots Before the Cold Comes (Not After)
Most gardeners wait until frost warnings appear before scrambling to protect their pots. By that time, the damage is often already underway.
Pot insulation should take place before the cold weather sets in — ideally in early autumn when temperatures begin to drop overnight regularly.
Why Pots Need Extra Protection in Cold Weather
Plants growing in the ground have the thermal mass of the earth for root protection. Potted plants have only a thin layer of ceramic, terracotta, or plastic separating their roots from the frigid air. The roots in pots can freeze through much more quickly than the ones in the ground.
A frozen root ball means a dead plant. Even technically “hardy” plants can be killed when grown in pots, as the roots are subjected to temperatures several degrees lower than they would endure if planted in the ground.
The Best Materials for Wrapping Your Pots
- Bubble wrap — great insulator, reusable for multiple seasons
- Hessian (burlap) — breathable, natural appearance, excellent aesthetics
- Fleece — lightweight, flexible, easy to wrap
- Old blankets or towels — free, surprisingly effective for one-off frosts
- Cardboard — not waterproof, emergency use only
Encircle the exterior of the pot from the rim to the base. Secure with twine or tape. Then move the pot to a sheltered location — against a south-facing wall, under a porch overhang, or into an unheated shed or garage.
Cold Hardiness of Common Pot Materials
| Pot Material | Frost Resistance | Risk in Hard Freeze |
|---|---|---|
| Terracotta | Low — cracks easily | High — can shatter |
| Glazed ceramic | Low | High — glaze cracks |
| Plastic | Medium | Medium — becomes brittle |
| Fibreglass | High | Very low |
| Fabric grow bags | Very high | Very low |
If you have terracotta pots with a plant you love — bring it in for winter. No amount of wrapping fully protects them in a hard freeze.
Trick #5 — Water Wisely During Winter (The Counterintuitive Truth)
Most people stop watering in winter and assume plants don’t need it. That is partially true — but only partially.
The reality is more complicated. And getting it wrong in either direction — too much water or not enough — can kill plants just as surely as the frost itself.
Why Overwatering in Winter Is Dangerous
Cold soil drains slowly. Plants grow slowly. That means water lingers in the soil much longer than it does during summer. Wet roots in cold soil are a sure path to root rot — a fungal condition that moves rapidly and kills quietly.
Reduce watering drastically as temperatures drop. Most outdoor plants and pots require watering only every 10–21 days in winter, if at all.
Why Underwatering in Winter Is Also Risky
Here is what most people miss: plants can be killed by drought stress in winter, even when it is cold.
This is particularly prevalent in dry, windy winters. Evergreen plants — many shrubs, conifers, and winter herbs among them — lose moisture through their leaves year round. If the ground is frozen and they are unable to pull up water, they desiccate from the inside out.
The key is to water on mild days when soil temperatures are above freezing. Water in the morning so that it has time to soak in before evening temperatures drop.
Winter Watering Quick Guide
| Plant Type | Winter Watering Frequency | Special Notes |
|---|---|---|
| Deciduous trees & shrubs | Rarely — only in dry spells | Dormant, minimal need |
| Evergreen shrubs | Every 3–4 weeks in dry weather | Wind increases moisture loss |
| Potted plants (indoors) | Every 10–14 days | Reduce from summer schedule |
| Potted plants (outdoors) | Every 14–21 days | Check soil before watering |
| Winter herbs (rosemary, thyme) | Every 2–3 weeks | Never let roots sit in wet soil |
Trick #6 — Build a DIY Cold Frame (Your Secret Weapon for Year-Round Growing)
A cold frame is a bottomless box with a transparent top. It covers your plants, allows sunlight to come through, and holds warmth within — almost like a small greenhouse.
And the best part? You can construct one for next to nothing.
How a Cold Frame Works
The see-through top (glass, polycarbonate, or even heavy plastic sheeting) allows sunlight to penetrate during the day, warming the air and soil inside. At night it holds that warmth in, keeping the inside air several degrees warmer than the outside air.
A properly placed cold frame can give your growing season a 4–6 week extension at each end of winter.
How to Build a Simple Cold Frame in a Day
What you need:
- Four pieces of wood or reclaimed timber for the sides
- An old window frame, sheet of polycarbonate, or heavy clear plastic for the lid
- Hinges or simply prop it open with a stick
Basic dimensions: 120cm wide × 60cm deep × 30cm tall at the front, sloping up to 45cm at the back. The slope assists rain runoff and should be oriented towards the sun.
Where to place it: Against a south-facing wall that gets full sun and is shielded from wind.
What You Can Grow in a Cold Frame Through Winter
| Plant | Cold Frame Minimum Temp | Notes |
|---|---|---|
| Lettuce | -5°C (23°F) | Great cold frame crop |
| Spinach | -8°C (18°F) | Very cold hardy |
| Kale | -10°C (14°F) | Thrives in cold |
| Carrots | -7°C (19°F) | Cover with straw too |
| Winter herbs | -5°C (23°F) | Parsley, chives, coriander |
| Pansies | -8°C (18°F) | Colour through winter |
Trick #7 — Feed Plants Correctly Before Winter Arrives (Timing Is Everything)
What you give your plants in late summer and autumn directly affects how they overwinter. Most gardeners fertilize the same way every season — and that’s a big mistake.
Stop Feeding Nitrogen in Late Summer
Nitrogen promotes leafy, tender, rapid growth. That’s great in spring. But in late summer and autumn, soft new growth is the first thing frost kills. Lush, nitrogen-fed foliage going into winter is a liability, not an asset.
Cut all nitrogen-rich fertilizers in late summer — about 6–8 weeks ahead of your first frost date.
Switch to Potassium (Potash) Instead
Potassium — which appears on fertilizer labels as “K” — is the winter-prep nutrient. It does several important things:
- Toughens up cell walls, helping them to withstand cold temperatures
- Assists plants in moving sugars and starches to their roots for winter storage
- Enhances overall hardiness and disease resistance
In early to mid autumn, work in a potassium-rich fertilizer such as sulphate of potash or a tomato feed (which is generally high in potassium). That allows time for plants to absorb and use it before they go dormant.
Autumn Feeding Schedule
| Month | What to Apply | Why |
|---|---|---|
| Late summer (Aug) | Stop nitrogen feeds | Prevent soft, frost-vulnerable growth |
| Early autumn (Sep) | Apply potassium feed | Strengthen cells, boost hardiness |
| Mid autumn (Oct) | Apply slow-release potassium | Final nutrient boost before dormancy |
| Late autumn (Nov+) | Stop feeding entirely | Plants are dormant — feeding is wasted |
Trick #8 — Reposition Plants Strategically (Use Your House as a Heat Source)
Your house radiates heat. Your walls, windows, and even the ground near your foundation all remain warmer than exposed garden beds. Using this to your advantage is one of the best cold weather tricks there is.
The Warmest Spots in Any Garden
South-facing walls are the warmest spot in most gardens. They soak up sunlight all day and radiate that warmth back out at night, creating a microclimate a few degrees warmer than the rest of the garden. Tender plants placed here often weather temperatures that might kill the same plant if it were in an open bed.
Under overhanging eaves — the edges of your roof overhang protect plants from frost, which usually settles first on exposed surfaces. Plants sheltered under the eaves remain noticeably warmer.
Against the house foundation — the ground directly next to your house stays warmer due to heat escaping from the building. For borderline-hardy plants, a few degrees of difference can mean the difference between life and death.
If you’re looking for more ideas on making the most of small outdoor spaces through every season, Small Balcony Garden is packed with practical advice on positioning and protecting plants in compact areas.
Moving Potted Plants: The Winter Migration Plan
Think of your potted plants like birds — they need to migrate with the season.
| Temperature Outside | Move Pots To |
|---|---|
| 5°C to 10°C (40–50°F) | Sheltered spot — against south-facing wall |
| 0°C to 5°C (32–40°F) | Under eaves or into a cold porch |
| -5°C to 0°C (23–32°F) | Unheated shed, garage, or cold greenhouse |
| Below -5°C (23°F) | Heated conservatory or indoors |
Don’t wait until the last minute to bring tropical or tender plants back indoors. Rapid shifts in temperature are almost as stressful to plants as the cold itself. Move them gradually over a few days — sheltered outdoors first, then the cold porch, then inside.
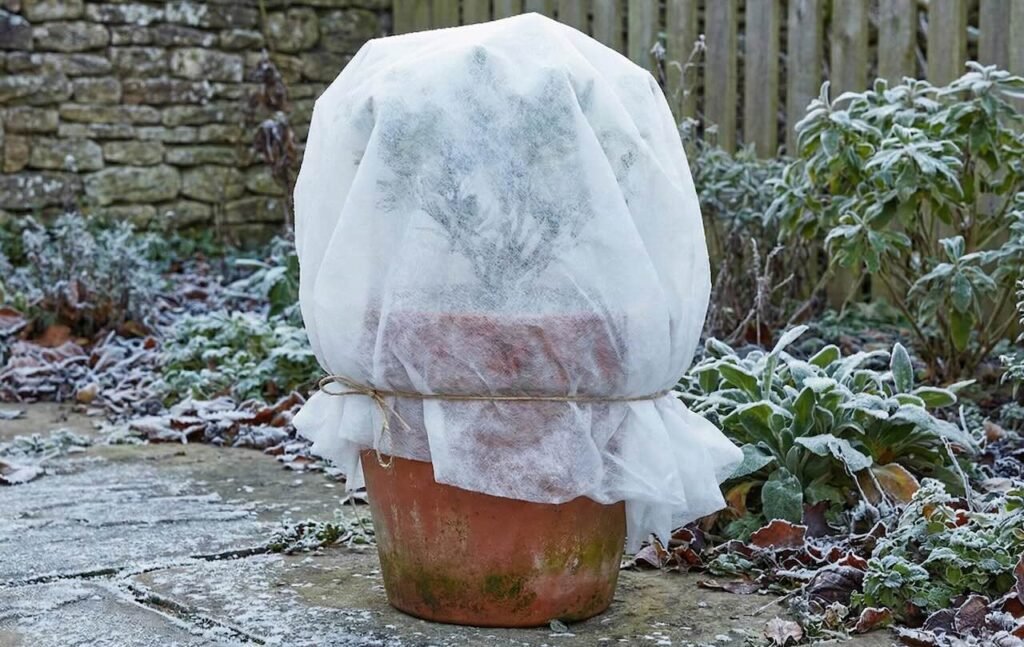
Protect Outdoor Plants With the Tent Method
For plants that are in situ — established shrubs, climbers on walls, small trees — the tent method is a brilliant solution.
Insert four bamboo canes into the soil around the plant in a square. Cover the canes with horticultural fleece, tucking the bottom edges into the soil or weighing them down with stones. This creates a warm tent of trapped air around the plant. Leave a bit of slack in the fleece so that it doesn’t touch the leaves directly — direct contact with frozen fleece can still inflict frost damage.
Your Complete Cold Weather Tricks Cheat Sheet
| Trick | Key Action | When to Do It |
|---|---|---|
| 1. Know your frost dates | Find out your first frost date | Early autumn |
| 2. Mulch heavily | Apply 5–15cm around root zones | Before first frost |
| 3. Use cloches | Cover individual vulnerable plants | When frost is forecast |
| 4. Wrap your pots | Insulate with bubble wrap or hessian | Early autumn |
| 5. Water wisely | Reduce watering; water on mild days | Throughout winter |
| 6. Build a cold frame | Assemble and position south-facing | Before temperatures drop |
| 7. Switch to potassium feed | Stop nitrogen, apply potash | Late summer/early autumn |
| 8. Move plants strategically | Migrate pots to warmer spots | As temperatures drop |
Frequently Asked Questions About Cold Weather Garden Tricks
Q: At what temperature should I start protecting my plants from cold weather? Consider protection when overnight temperatures consistently drop below 5°C (41°F). When frost is forecast — usually at or below 2°C (35°F) overnight — most tender plants need covering or moving.
Q: Can I use regular household blankets to protect plants from frost overnight? Yes — old blankets, towels, and even cardboard are all good emergency frost protection. The trick is to remove them during the day so plants are still receiving light and air. Don’t leave them on longer than a day or two though, as trapped moisture can promote mold.
Q: My potted plants survived last winter without any protection. Do I still need these tricks? If your plants made it through, they were likely very cold-hardy varieties or you simply had a mild winter. These tricks provide you insurance — particularly for less-hardy plants or in years when temperatures drop lower than usual. One bad frost can obliterate years of growth.
Q: Is it safe to bring outdoor plants inside for winter? Yes — but do it gradually. First move plants to a protected spot outdoors, then to a cold porch or unheated garage, and finally into the house over the course of a week or two. Inspect for pests too, before moving plants inside. Spider mites and fungus gnats thrive during the transition.
Q: Should I prune plants before winter or wait until spring? For most plants, light tidying in autumn is fine — snip off dead or diseased growth. But wait until late winter or early spring to do heavy pruning. Pruning encourages new growth, and that new growth heading into winter is incredibly susceptible to frost damage.
Q: Does fleece actually make a real difference to plant temperatures? Yes — a double layer of horticultural fleece can increase the temperature surrounding a plant by 3–5°C (5–9°F). That may not sound like much, but it is often precisely the difference between a plant surviving or not. Fleece is one of the best value investments in cold weather gardening.
Q: Can I leave my cold frame outside all year? Absolutely. Cold frames are built to handle all weather. In summer, simply leave the lid wide open or remove it entirely to avoid overheating. Use it for hardening off seedlings in spring and as a propagation station in summer.
The Final Word on Cold Weather Gardening
Winter doesn’t have to mean a garden of the dead.
The 8 ultimate cold weather tricks in this article are not complex theories from gardening books. They’re practical, hands-in-the-dirt techniques that work in real gardens, in real winters, for real gardeners.
What distinguishes the gardeners who get everything wiped out in a frost from those who sail through winter with plants still thriving? Preparation. Timing. And a few clever, straightforward tricks applied at the right time.
Start before the cold arrives. Know your frost dates. Mulch early. Wrap your pots. Build a cold frame if you can. Late summer is the time to change your fertilizer. Move your plants toward warmth. And water with your head, not out of habit.
Do those things — and winter ceases to be something you dread, and becomes just another season you garden through.
Small actions. Big results. Your plants are worth it.